

Cribl’s interface is Super Neato: Reactive, beautiful, and easy to use. But sometimes you need to access settings and configurations programmatically. The good news is that interactive API docs are baked into your Cribl instance. The better news is that everything that happens in the GUI is making API calls. With your browser’s developer mode, you can easily take a peak behind the curtain to see exactly how the API was called and what the payload looked like.
In this post, we’ll cover the basics of using the docs and the API to understand a few simple use cases.
The Basics of Cribl’s API Docs
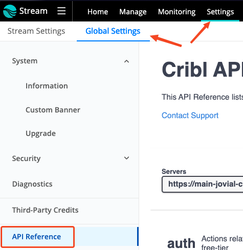
We’re going to use the API to get a list of Worker Groups. Before we do, we should understand what’s required by the API. The best place to find the API documentation is right in the Cribl interface. Click Settings, Global Settings, and finally API Reference:
On the resulting screen, you’ll see a dropdown menu to select which context you want the samples to work in. This is important to set before grabbing any example paths. The top selection will be for interacting with the Leader context. For example, getting a list of Worker Groups is a Leader context action.
In contrast, the entries that have /api/v1/m/ in the path are referencing Groups’ and Fleets’ API endpoints. Adding a new source or destination is a Worker Group or Fleet context action. Mind your context!
When you execute an endpoint’s sample in the app, you’ll be able to see an equivalent curl command including authentication and all parameters. You can use this to run the command yourself, or call it from a shell script.
Some of the endpoints will require parameters that you’ll need to fill out before hitting the execute button.
You may notice a pattern in the verbs. There is some logic to this:
-
GET– display, or read an object or config -
POST– create an object or config -
PATCH– update an existing object or config -
DELETE– remove an object
In each case, the endpoint is the same, but the payload may vary. If you’re using curl to prototype, use the -X flag to specify which verb. If you’re using a library in your favorite scripting language, the various verbs should be available for use.
We’re skipping over authentication for now. See further below for details.
Example One: Get a List of Worker Groups
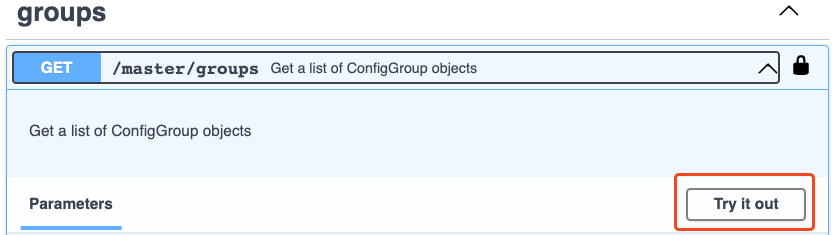
For this example, we’re staying in the Leader context so we can list the Worker Groups. Find the groups heading on the page:

Click on the top entry, “Get a list of ConfigGroup objects”
In the resulting content, you’ll see an option to Try it out:
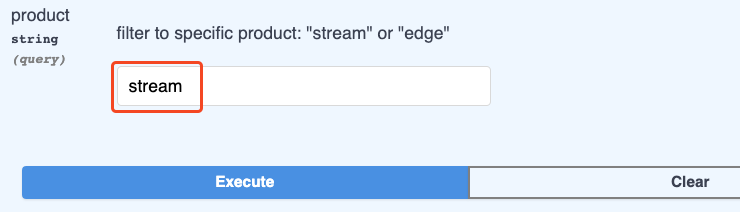
Click that. If there are parameters available for the endpoint you are querying, you’ll see them activate after clicking Try it out. For this one, let’s put Stream in the product field and click execute:
After clicking execute, you will see a complete curl command that you can copy and inspect. You’ll also see the response body. You can run the curl command on just about any Linux or macOS system verbatim to get exactly the same output. Slick.
curl -X 'GET' \
'https://main-instanceid.cribl.cloud/api/v1/master/groups?product=stream' \
-H 'accept: application/json' \
-H 'Authorization: Bearer verylongbearertokenhere'
Example Two: Listing All Workers and Their Status
This example could be useful for monitoring the status of Cribl Workers and Edge Nodes connected to a Leader. We will query the Leader API for a list, which includes lots of extra info like their status and when they started running. For this demo, you will need the jq command installed. Most package managers will have access to it by default.
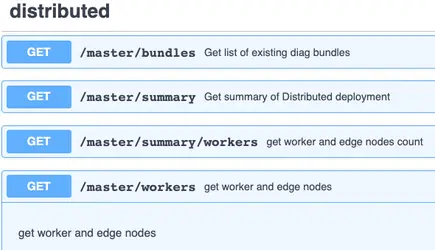
On the API ref page, look for the distributed section, and /master/workers under that heading:
Click the Try it out button, and grab the curl command. On your Linux or macOS system hop into a shell and run the curl command followed by the following jq incantation:
jq '.items[] | {hostname: .info.hostname, status: .status, uptime: .cribl.startTime}'
The whole command should look something like this (I added the -s flag to curl to silence the progress output):
curl -sX 'GET' \
'https://main-instance.cribl.cloud/api/v1/master/workers' \
-H 'accept: application/json' \
-H 'Authorization: Bearer verylongbearertokenhere' \
| jq '.items[] | {hostname: .info.hostname, status: .status, startTime: .info.cribl.startTime}'
And the output:
{ "hostname": "homenas", "status": "healthy", "startTime": 1694607157 } { "hostname": "vpn", "status": "healthy", "startTime": 1694814102 }
Baller. This could be fed into a monitoring system to keep tabs on your workers. There are other metrics available in the payload that may interest you. Go forth and explore!
Example Three: Behind the Curtain
Sometimes you just want to see exactly how it’s working with your actual data. Maybe you’re not following the docs. Or like me, you’re just an impatient monster. There is another way!
In this example, let’s figure out how to create a bearer token for an HTTP (or HEC) input via the API. I’m assuming you have an input already defined. Access the input configuration screen and go to Auth Tokens:
Hit the Add token button and prepare the new entry, but don’t click Save yet! Before hitting save, open up your browser’s developer mode and go to Network. Stop the collection, and clear the list. In Arc:
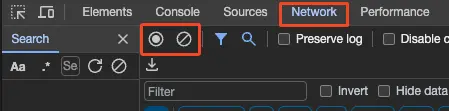
Do this part quickly to reduce the noise: Click on the record button to start capturing activity, immediately click the Save button to make the change, and then again click the record button to stop the capture. Now you can check the captured events. In my case, I see the input name with a little widget next to it (indicating post activity):

Clicking that event will allow you to see details. Check the Headers tab:
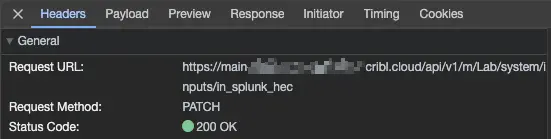
Notice the endpoint! It references m, meaning we are in a Group or Fleet context! In the case of my screencap above, it’s the Lab Group. And still more info below this in the Request headers section. In particular, the Bearer authentication token is in there, and the Content-Type: application/json spec.
Now click on the Payload tab to see the JSON that was sent:
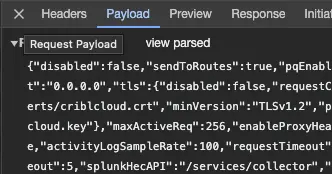
What are we seeing here? The payload is basically the entire config, with the new bits added. And that is the purpose of the PATCH action. If you check the API reference you can find an explainer. In order to use this method to add a new token, we’d first request the config using GET on the same URI. Then update the config to include the new token. And finally, PATCH with the modified JSON as the payload. Something like this:
$ curl -sX GET -H "Authorization: Bearer verylongbearertokenhere" \ 'https://main-instance.cribl.cloud/api/v1/m/workergroup/system/inputs/in_splunk_hec' <modify the output to include a new token, save to file.json> $ curl -sX PATCH -H "Authorization: Bearer verylongbearertokenhere" \ -H "Content-Type: application/json" \ -d @file.json\ https://main-instance.cribl.cloud/api/v1/m/workergroup/system/inputs/in_splunk_hec
💡It should be noted that there is a more precise endpoint for this task:

In that case, you won’t need to download/upload the entire config. See if you can figure out the right incantation on your own with the above endpoint.
Getting Authenticated
The samples above all used a bearer token captured from the interactive API page. This is fine for prototyping your use cases. Once you move to actually using a scripted interaction with Cribl you’ll very likely want to handle authentication in the script itself.
Self-Hosted
The /api/v1/auth/login endpoint is responsible for authentication in a non-SAAS, aka self-managed, Cribl Leader. You’ll need to POST to this endpoint, with a JSON payload of username and password. The returned JSON will include a bearer token which you can use in subsequent calls’ Authorization header. As with the other endpoints, the API docs have more info.
Code example
curl -X POST\ -d '{"username":"jsixpack","password":"l33tp@assword"}'\ -H "Content-Type: application/json"\ https://leadername:9000/api/v1/auth/login
Cribl Cloud
Getting a bearer token from Cribl Cloud requires a bit more work. First, you’ll need to define API access credentials in the Cloud landing page, under Organization.
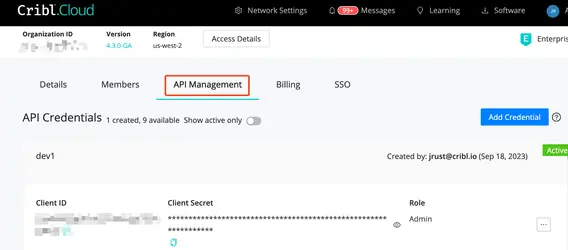
Once you have a valid Client ID and Client Secret from the portal, you’ll need to post to the authentication endpoint, https://login.cribl.cloud/oauth/token, with the proper payload. Here's a sample:
curl -X POST\
-d '{"grant_type": "client_credentials","client_id": "client_id_string_here", "client_secret": "client_secret_string_here","audience":"https://api.cribl.cloud"}'\
-H "Content-Type: application/json"\ https://login.cribl.cloud/oauth/token
The resulting JSON payload will include the bearer token.
Conclusion
The API is not as hard to use as it seems. Between the docs, the samples here, and seeing how the interface utilizes the API to do its job, you should be able to control, configure, and monitor just about any aspect of the Cribl system!